Digital frequency counter is being used for wide range of applications. Digital frequency counter extensively uses digital circuits and hence fairly good knowledge of digital circuits and of digital integrated circuits is required to understand the operation of the frequency counter. However a person who is not familiar with any electronics circuits and experiments has in written this article.
Theory of operation
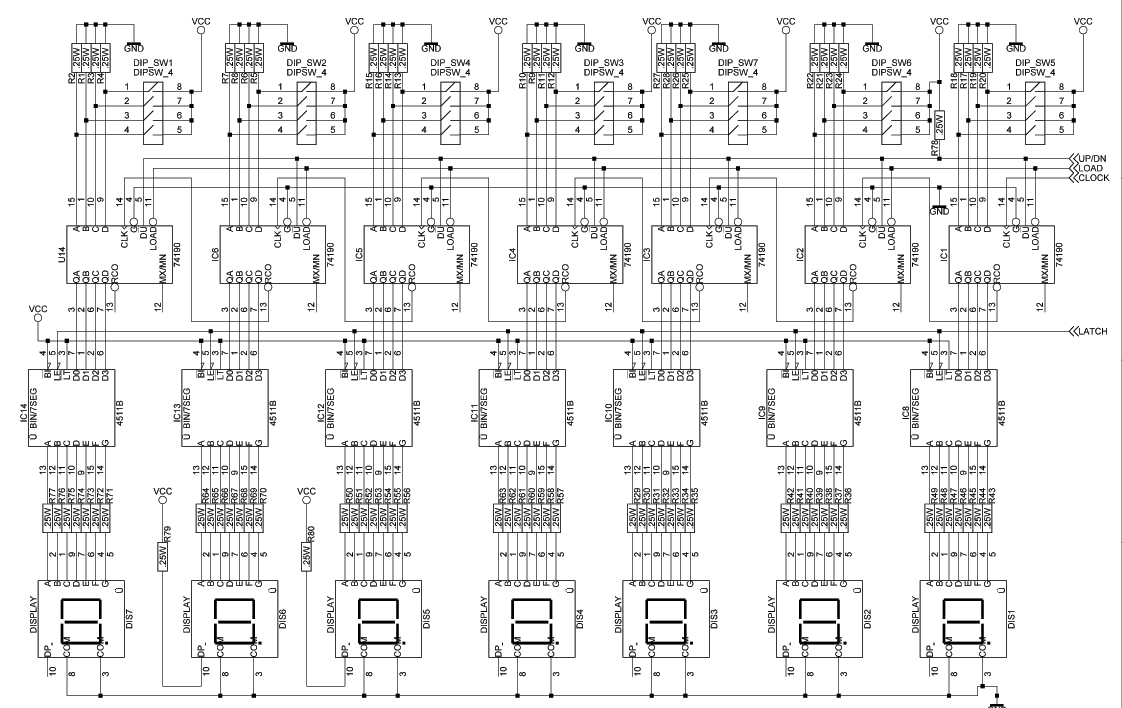
The frequency counter has to count the number of cycles per second of an incoming signal. Hence we need a device to count. In electronics circuits, counter ICs are available for counting. These IC's can count the input pulses. The count is given as coded output from the IC (in binary form or BCD form). The count must be converted into decimal digit to be understood by human beings. More number of IC's can be cascaded to increase the number of digits. The number of digits required for the counter to display the count value depends on the application and the accuracy needed. In our design we use a single 4 bit BCD high-speed CMOS counter chips. One chip is used for one digits and we use 7 similar ICs to get seven digit counter. Also we use CMOS decoder IC to decode the BCD out put of the counter to drive 7 segment displays.
Since the counter can count only digital pulses, we need to convert the incoming signal wave to digital pulse or we should obtain one pulse for every input wave. Hence we need a special circuit to shape the input wave into a square wave of same frequency and amplitude confined to the TTL signal levels. A signal conditioning section is needed for this purpose.
The input Signal-conditioning section consists of the following stages.
- Amplifier or attenuation stage
- TTL level converter stage
Besides the above initial stages, some times a few more additional stages such as input protection stages, filter stages, etc are can be found in some designs. The input whose frequency is to measured is given to the input stage consisting of the above and the out put of this stage is the square pulses. Now the square pulses are given to the counter to count the number of pulses for a fixed duration. If the duration is 1 seconds, then the counter displays a value that equals to the number of cycles per second, now if we want to measure a frequency of say 20MHz, the counter should display 20000000. this means the counter should have 8 digits to display. Now the resolution of the counter ( minimum change of frequency that can be displayed ) is 1Hz. If we do not require that much of resolution, we can reduce the number of digits. For example, if we are counting the input cycles for a duration of 0.1 seconds, the display shows 2000000. Now if we put a decimal points after two digits from the left of the display, the frequency can be read in MHz, in both cases, the resolution for the later being 10Hz. The time for which the counter is counting is called as gating time and if the gating is say 1 milli second, we get a display with resolution of 1kHz. A frequency counter must always count the input frequency and display frequency. This means there should be an arrangement to count the input for a fixed time, display the reading. While displaying the reading, the counter should clear again to read input again. Then only we get a continuous reading that displays the correct frequency at all times. A control circuit is needed to achieve this. The function of the control circuit to generate the following signals.
- Clear the counter for refreshing
- Provide a precision gating signal to allow the input pulses to the counter circuit
- Latch the count value to decode and display
- Repeat the above steps continuously to get a continuous reading
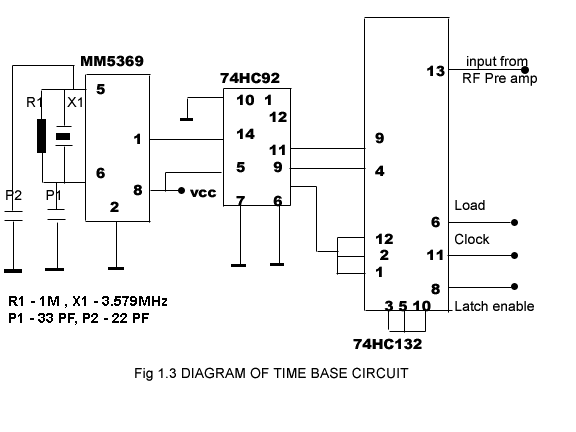
The control circuit must operate with precision timing. This is achieved by deriving all timing signals from a crystal oscillator or time base circuit. The accuracy of the counter solely depends on the stability and accuracy of the time base circuit.
The Circuit
The counter circuit is designed using discrete digital ICs. The number of ICs are more in this design. However the cost of the counter well lower that a single IC design. The circuit is capable of counting up, counting down and also capable of programming initial value. This feature is often required if you want to know the frequency of a station tuned by using your super heterodyne receiver. We can display the station tuned in by measuring the local oscillator frequency. The actual frequency is + or - , if the frequency from the local oscillator frequency. The IF frequency can be loaded by using the dip switches on the counter board (BCD value).
The counter chip used is 74HCT190. This IC consumes less power and counts up to say 50MHz. If you are not in a position to get HCT version you can replace the same with any family of 74 series. the decoder IC is CD4511. This is a CMOS IC consisting of latch, decoder, and seven segments LED driver.
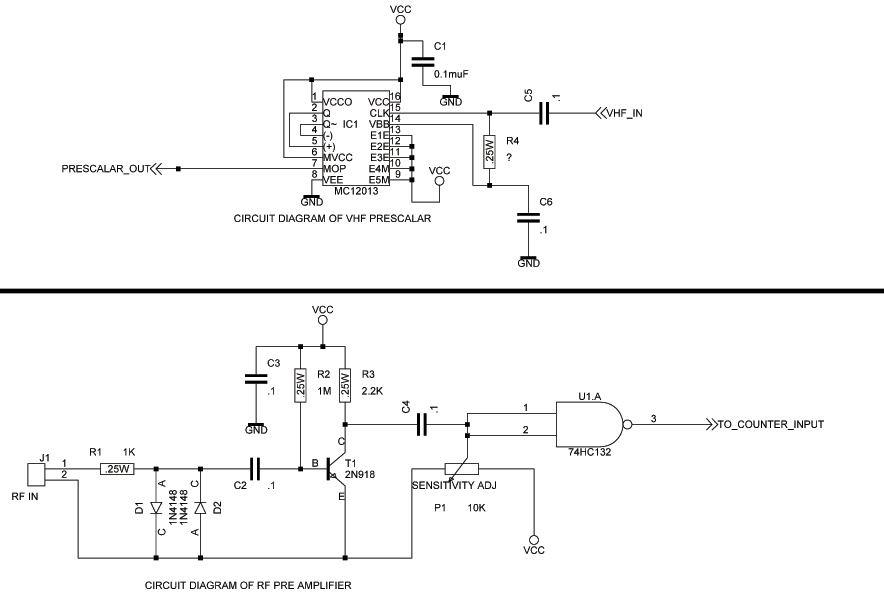
The control circuit is designed using freely available time base chip MM5369 and two TTL chips. The 5369 consist of a crystal oscillator and a divider. If we connect a crystal of 3.579 MHz we get 60Hz frequency as a output. This frequency is again divided by 12 counter chip IC7492. Together with 7492 and the schmitt trigger NAND gates the necessary control signal are derived. The gating time is 100 milli seconds hence the frequency shown is 1/10 of the actual frequency in Hz. The inputs section consists of a single transistor RF pre amplifier. Diode limiters are provided at the input to protect the transistor from high RF voltages if applied. the sensitivity of he counter is around 100 milli volts. A potentio meter is included in the circuit to adjust for proper operation of the counter. If you needs more sensitivity you can add a preamplifier to the front end. If you need to measure audio frequencies using this counter, then the pre amplifier must be changed.
The counter is capable of counting of all HF signals, but if you need to measure VHF frequencies, you need a pre-scalar. Which divides the input by factor say 10 so that the out put is now 1/10 of the input. The frequency is now in the HF and can be easily read by the counter. Actual frequency is now10 times of the displayed frequency. A suitable pre-scalar for VHF counting also given in the circuit. The pre-scalar needs an input voltage of 500 mV to function. Hence you may require a VHF preamplifier to measure signals below 500mV amplitude.
Construction
Proper care is to be taken in selecting the components, handing and soldering the components. It is always better to assemble the circuit on a PCB. IC bases are highly recommended for the homebrewers who's not very familiar with the digital circuits while the IC bases are not recommended for an experienced builder as IC bases may cause loose connections and decrease the high frequency performance.
Assemble the IC bases and connectors first, followed by all resistors and capacitors. Control circuit can be tested easily with a logic probe. the preamplifier also can be tested with the help of RF probe. Normally there wont be any problem if every thing is assembled in a proper way.
The counter needs a 5V highly stabilised power supply capable of deriving about 1 Amperes. 3 terminal regulator IC 7805 is sufficient for this purpose. If power supply is not proper there can have malfunctioning for the counter.
Power supply to all IC's are to be de-coupled with 0.01 uf capacitor connected across the Vcc and Gnd pin with shorter leads. There can have several malfunctions if power is not properly de-coupled.